Between A Rock And A Hard Place
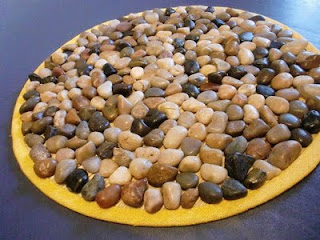
 It looks like a stone pizza, or maybe a large rock cookie. But it's not...it's even better! It's my dollar store centerpiece for summertime!
This textured, multicolored stone mat cost me just $4 to make and it looks absolutely beautiful on our wood dining room table. It's not designed to lay anything on top of it, so you can appreciate all of the different stones and patterns in it.
All you need is:
* a sturdy place mat
* two bags of river rocks
* a tube of heavy-duty adhesive
 And all of those things can be found at the dollar store. If yours doesn't have a strong-enough glue, one that's made for something heavy like rock, check the hobby store and hardware store. You'll appreciate having it later.
Starting in the middle of the mat, start laying out rocks. You can decide your own personal taste - you may want them very close together or you may want some of the mat showing through. My circular place mat is made of bamboo, so it looked better to have a little showing through. Plus, that saves some time, unless you're super particular about order and presentation.

From there, work in a random pattern until the entire place mat is covered. Follow the directions on your adhesive packaging to the letter. If it says let it dry a little and then attach, do it! If it says to wait 24 hours before you move it, do it! Not speaking from experience or anything...
You might even want to create a design within your rocks, like circles or a giant spiral. While I was working on mine, I could picture these as centerpieces at a wedding reception with the new couple's initials written in rock. Perfect for a summer or outdoor wedding.
When you're finished, it will be very heavy and probably very wet. Remember what the directions say and let it dry thoroughly. It will be a lovely addition to your table, but only if half of it doesn't end up on the floor.


Oh this is great, will look good on Country table too, we live in the woods and anything like this is so acceptable to me, our sofa in the living room is a Mossey Oak pattern, lol shows you how country we are, I love this and I know it is cheap to do, my favorite place to shop is Dollar General, Be blessed ♥
ReplyDeleteI knew we had the same country heart! Glad you like this idea - let me know if you try it out. Have a fabulous day in the Lord, Barbara!
ReplyDelete