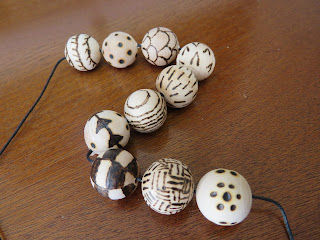
Wood Burned Beads For Rustic Jewelry
Since the beginning of the year, I've been trying to finish all the projects in my craft room that I started and tucked away for some reason. I am distracted no more, but focused on accomplishing some fun things and sharing them with you. That's where these wood burned beads came from - OK, so they came from a tin in the garage, but you know what I mean.
Since Danny upgraded to a new burning tool and gave me the old one, I can't stop using it. I have so many wood pieces that can take on new life in just minutes, and it's fun to learn new techniques and research ways to use all the wood pieces I have stored away.
One of the best techniques for working with small items, like these beads, is to thread them onto a toothpick and holding that instead of the bead itself.
It makes turning the bead as you work easier, and it steadies those of us with shaky hands so the details can be much more minute.
And now, onto my beads. I tried some fun patterns like alternating and offset lines. These are easy to start with, while you're learning how your specific wood burning tool works. The longer you hold it to the wood, the darker the mark, and you want to move it as slowly and carefully as you can.
Dots are quite simple, as you hold the tip to the wood and watch for the burn around the edges. Just be careful not to hold it for too long and it start smoking. To fill in shapes like these arrows, use the larger tip and move slowly across the area.
If you have steady hands, you can trace the grain of the wood and get some interesting patterns. This is not my strong suit, and the hash marks were difficult for me as well. They require a little forethought to come out evenly, and I don't think ahead very well. The feathers were one of my favorites, and I thought they looked so pretty.
Far and away, the flowers were my favorite design. Not only are they simple, but you can randomly repeat them and create more patterns. And the checkerboard pattern made me smile, as I was so proud of myself when the lines all matched up and I didn't have several small checks and then a super-large one.
I'll soon be headed back out to the tins in the garage to see what other wood shapes I have tucked away. Check back often to discover what other wood burning tips I've tried.


Comments
Post a Comment