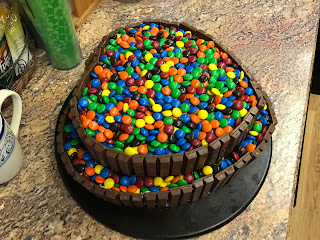
My Two-Tiered, Plaid, Candy-Covered Birthday Cake
First, a confession. This is not the cake I intended to make last weekend. One of the dearest, sweetest girls in my teen Bible study turned 18 on Friday, and her mom asked me to decorate the cakes for the surprise party. I would much rather decorate than bake any day, so she brought the finished cakes to my house. I immediately stacked them in the oven because you don't leave anything important on the counter when you have a Great Dane.
Are you already sensing the impending doom? Yes, after I heated up the oven for supper that night, we noticed an odd burning smell. And yes, it was the cakes heating up in the oven. They were so warm by that time that they stuck to the pans and the cutting boards. They were salvageable for birthday cake truffles, so Plan B became truffles and four more cakes of my own for the party.
So here is how I made a two-tiered, plaid, candy-covered birthday cake!
I started by tracing the outline of each pan onto newsprint. (What good writer doesn't have a roll of newsprint on hand? I know, right?) Then I made two more lines inside, 1.25 inches apart. These would be the templates to cut the cakes in rings for the plaid effect.
Then I cut the templates out and used a sharp knife to cut each of the four cakes into three rings.
Beginning on the bottom, I took the middle of the yellow cake and placed it between the rings of strawberry cake.
Naturally, the next layer was the opposite combination, making two layers of alternating colors. And the top two layers worked the same way. It's so pretty already!
Now for the candy-covered part. I put a thin layer of frosting all over the bottom two layers to be a glue for the candy. KitKat bars would then stay in place around the edge like a yummy picket fence.
Here it is with chocolate all the way around.
And ... repeated on the top layer.
For the finishing touch, the fenced-in areas were filled with M&Ms. The candy bars made it easy to fill the tops of the cakes with the candy.
A note about transportation: we had to get the cake from our house to the church in the middle of July in Iowa, so I stored the cake in the refrigerator until the very last minute. Then I held it in my lap in the passenger seat for the entire trip so I could hold it steady on the bumps. To keep the sun from melting the chocolate, I held the sun visor from the truck between the window and the cake while pointing the air conditioning vents right at it. Passing motorists probably wondered what I was doing, but it was worth the effort!
I also knew that cutting the cake was going to be a challenge with all the stacked candies on it - that's why I let somebody else wrestle with it! By cutting from the middle of the top layer out between the candy bars, they were able to take out individual slices. Some weren't the prettiest, but they tasted amazing!
Here's the plaid on the inside and the beginning of the candy cascade.
And here's what one perfect piece of this fun cake looks like. I was honored to be able to create something for one of our very special friends on her birthday.


Comments
Post a Comment