Posts

Showing posts from April, 2019

Trail Mix Banana Bread

Image
Tired of plain old banana bread? It may be really good, but let’s try something different today. Let’s combine three of our favorite trail mix ingredients to one of my favorite banana bread recipes ever, creating Trail Mix Banana Bread! Clever, right? I know. We’re going to add almonds, walnuts and mini chocolate chips to my cake mix banana bread to make something out of this world! I used my baking pan with the four braided loaves, just so I could spread the love around a little more. Ingredients: 3 brown, overly ripe bananas 1 box yellow cake mix 1/3 cup vegetable oil 3 eggs 2 cups mini chocolate chips 1/2 cup slivered almonds 1/2 cup walnut pieces 1. Preheat the oven to 350 degrees. Spray two loaf pans or four small pans with nonstick spray. 2. Combine bananas, cake mix, oil and eggs in a stand mixer until smooth. 3. Fold in chocolate chips, almonds and walnuts. Pour into prepared pans. 4. Bake at 350 degrees for 50-55 minutes for large loaves or 40-45 minutes

Creating For God’s Glory

Image
Someone made this sign with their own two hands. They outlined it, filled it in and made it beautiful with their own creativity and talent. One piece of handmade art is more loved and treasured than 100 piece of art that were mass-produced. From the very first verse of Scripture, creating things is given the utmost importance: In the beginning, God created... Genesis 1:1 We were lovingly created by a God who sees great blessing in doing things by hand. We were created in His own image, with our own gifts and personalities, instead of being stamped and pressed into a mold. How boring life would be if we were machine-made and all looked alike. And that ye study to be quiet, and to do your own business, and to work with your own hands, as we commanded you. 1 Thessalonians 4:11 Just as the Lord creates, He has built a longing for creation into us, too. Paul remind the church at Thessalonica that they were to be quiet, yes; to be about their business, yes; but they were also to

Sunday Sketch

Image
Today’s sketch features a center sentiment with a bunch of fun circles all around it. Think bubbles, rocks, cups and saucers or even the pack yard swimming pool! You could use this sketch a dozen times and never make the same card twice. For my card, I chose a masculine theme and using punched feathers for my embellishments. The larger circles are layered with textured card stock circles of the same size. The A Birthday Wish sentiment is made of the same metallic paper as the background stripes and is raised on 3D adhesive for some added dimension. Ready to make this layout yourself? Here’s the sketch for today’s card. Start with a plain card stock and a coordinating decorator paper. I always layer them to give it more depth and dimension. Cutting your decorator paper 1/2 inch smaller than your card will give you a nice 1/4-inch border all the way around. Then just grab your punches and have fun! They can be all the same size, mixed together or a whatever your creative he

Reasons Christian Women Need Ladies Retreats

Image
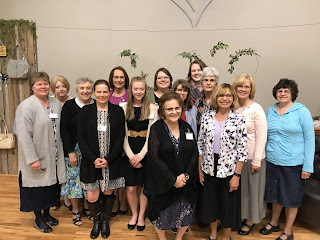
What a blessing to have 14 sweet sisters in Christ go to a ladies retreat this weekend. There’s something special about gathering as women to worship and learn that grows and knits us together. Why attend a ladies meeting? Oh my goodness ... here are just a few reasons why they’re so important. * Time spent together draws you together. Even just a few hours with friends over a weekend creates strong bonds that stand the test of time. * Hearing different women speak gives you new perspective. Even if you’re not familiar with the women chosen as speakers for the retreat, you might gain new perspective into Scriptures. * Breaking the monotony of your routine always feels good. Go somewhere new and meet new Christian friends. Pick up one of the speaker’s books and learn something new. Start a new lesson or study based on the theme of the conference. * Fellowship for the journey. Stick a bunch of ladies in a van or bus for a while and enjoy the stories, fun and conversations tha

Our Trip To The Promised Land Zoo

Image
On our trip through Branson last week, we made a stop at the Promised Land Zoo. It was a great way to start the day, walking a couple of miles and meeting some amazing animals. As a bonus, the zoo is run by Christians, and there is Scripture and the Romans Road posted all over the property. Here is just a sampling of the photos we took on our zoo trip! There are several of these pictures that I've set aside for Danny to do wood burnings of for Stuff From Trees. If you love that idea, let him know which ones you'd like to see!

Brown Sugar Cinnamon Baked Pineapple

Image
When pineapples are on sale at the grocery store for 89 cents apiece, that’s too good to resist. Baking them with brown sugar and cinnamon makes resisting futile. The only prep for this dish is to slice and cube the pineapple. From there, you mix everything together, pour it in a baking dish and let your oven do the rest. Ingredients: 1 medium pineapple, cubed 3 Tbsp melted butter 1/4 cup packed brown sugar 3 Tbsp cinnamon 1. Preheat oven to 450 degrees. Line a 9x13-inch baking dish with aluminum foil. 2. Combine all ingredients in a large bowl, tossing to coat the pineapple, then pour into baking dish. 3. Bake at 450 degrees for 12 minutes. Stir pineapple and bake for another 12 minutes.

Words For Wednesday

Image

My Bullriders Of America Finals Scrapbook Page

Image
If you've ever tried to create a scrapbook layout with a large piece of memorabilia, like a program or a signed photo, you know how difficult that can be. It's way too bulky to adhere to the page, or it takes up too much room or you won't be able to open it once you get it in place. And all of that stifles the creative process, right? Today we're going to create a pocket page that will solve all your problems. For my page, I used the program, photos and tickets from the Bullriders of America finals in February. I also chose a piece of 12x12 textured card stock, a 12x12 denim patterned paper and some die cut embellishments. Add a handful of metal brads to the pile and you have all the components of a great scrapbook page. I trimmed the denim paper down so there was a 1/2-inch margin on the sides and the bottom. I took more off the top to make the pocket. The denim paper is then tacked down with metal brads on three sides. This creates a sturdy pocket w

Spring On The Carrel Wildlife Preserve

Image
It is very slowly and deliberately becoming spring on the Carrell Wildlife Preserve. After a long, cold winter, even the slightest flash of green brings a smile to my face. We had quite a bit of brush along the driveway cut back by utility workers a few months ago, but what's still there is turning green again. They reseeded those portions they removed, so I'm excited to see what the result of that will be. We haven't planted any plants or flowers yet this year, so these tiny violets absolutely made my day.  Since most of our property is wooded, it's so much fun to watch them turn green every spring. I love this shade of green - that light and airy color that gives hope of warmer days to come. And, of course, the wildlife loves spring, too. The turtles have been hibernating under the ice for months, so they're delighted to come out and sit in the sun. The coyotes, deer, turkeys, otters, muskrats and many other animals are enjoy

Because He Lives!

Image
May this Resurrection Day find you filled with joy and hope because Jesus lives! Wishing you all the blessings of God on this special day and in the year to come.

Jesus' Last Days - All The Way To The Cross

Image
Today's post is the continuation of yesterday's look into Jesus' last days on earth. To read the first part, click here . When Pilate saw that he could prevail nothing, but that rather a tumult was made, he took water, and washed his hands before the multitude, saying, I am innocent of the blood of this just person: see ye to it.  Then answered all the people, and said, His blood be on us, and on our children.  Then released he Barabbas unto them: and when he had scourged Jesus, he delivered him to be crucified.  Then the soldiers of the governor took Jesus into the common hall, and gathered unto him the whole band of soldiers.  And they stripped him, and put on him a scarlet robe. Matthew 27:24-28 Jesus already knew He would be mocked this way. He knew their spite, dressing Him up like fake royalty. But He also knew that all this would come full circle, and the robe would mean everything. I will greatly rejoice in the LORD, my soul shall be joyful in my God; for he

Jesus' Last Days - The Holy Week

Image
Jesus Christ took on the form of man. He walked the same paths we're walking today. Our human hearts forget that, though, as we let situations and circumstances block that out. When we're feeling alone or hurt or sad, Jesus knows. And He can relate because He's been there. But at the same time, He was still completely God. He was never surprised by the twists and turns of life, and He knew the significance of each event. As we look through the last days of His life, we can clearly see that Jesus knew. Now the chief priests, and elders, and all the council, sought false witness against Jesus, to put him to death;   But found none: yea, though many false witnesses came, yet found they none. At the last came two false witnesses,   And said, This fellow said, I am able to destroy the temple of God, and to build it in three days.   And the high priest arose, and said unto him, Answerest thou nothing? what is it which these witness against thee? Matthew 26:59-62

Easter Morning Breakfast Cresent Ring

Image
Make Easter morning breakfast simple and tasty with a cresent ring. Fill it with some favorite breakfast ingredients and enjoy more time with your family instead of slaving over the stove. Ingredients: 2 cans refrigerated cresent rolls 1 box pre-cooked bacon 1 package refrigerate sausage crumbles 1 cup shredded cheddar cheese 4 eggs Milk Salt and pepper to taste 1. Preheat oven to 375 degrees. 2. Beat four eggs with a splash of milk. Scramble in a small skillet. 3. Open both cans of crescents and fan them around a pizza pan. A small bowl upside down in the middle will help make your circle. 4. Layer eggs, bacon, sausage and cheese around the thick, inside part of the ring. 5. Remove the bowl and fold up the points of each cresent and tuck it under in the middle. 6. Bake at 375 degrees for 25-30 minutes, until the cresents are browned and the cheese is melted.

Words For Wednesday

Image

Words For Wednesday

Image

Fun New Looks For Custom Card Orders

Image
 I had the joy of making a set of custom cards for a friend last week. She blessed my heart because she is dealing with a serious health problem, but she still has other people on her mind. That’s why I was delighted to make these cards for her. I had been given a boatload of greeting cards to upcycle, and several of them just screamed “make me into a birthday card!” With some of them, I was able to punch out the images and repurpose them as a fun border. Others had big, beautiful sentiments on them that I could cut out and raise on 3D adhesive. This might be my favorite card of all. It’s made in shades of green, and each little word or phrase just needed a little color around the edges to make it stand out. Finally, I was asked to make some masculine birthday cards, since they’re so difficult to find at the store. That’s why I adore these feathers, especially with the metallic birthday sentiment in the middle. I pray over every card I make, that the

Where Are You Running?

Image
On Saturday night, we noticed some lights on top of the ridge. We have two neighbors back that direction, but we weren't concerned just yet. As the lights continued to grow, we realized they were tiny fires, like they were working on a burn pile. Over the span of a few minutes, the fires had grown considerably. We continued watching them grow and spread until we were getting concerned. It's been fairly dry here over the past couple of weeks, and a good wind would send the flames in our direction. It wasn't long before we saw flashing lights and heard the sirens of the fire trucks coming. The flames were huge, and it took the better part of an hour to put them out. We so appreciate our fire department for stopping what could have been a disastrous situation. At one point in the firefight I took the dogs outside, and I was amazed. I could hear the rush of the flames on top of the hill, but I could also hear pounding footsteps through the leaves on the ground. The anim

Sunday Sketches

Image
While some old Stuff From Trees inventory, I found this adorable little spring-themed card. I don't really remember making it, so it must have been some time ago. I love the layout, though, and it's perfect for today's sketch. To make my card, I made the blue background first, attaching it with double stick tape. Using the four images to judge the size, I cut four square mats for them out of the same blue card stock. The size of those four squares determined the size of the pick mat behind them, and then I centered it on the card. The remaining stickers from the April set fill in the empty space around the large images. Lastly, the sentiment overlaps the top two squares, tying them together in a cute way. To use today's sketch, choose two coordinating card stock colors and a small set of images. You'll use them for the blocks and for the background and mat. If you use stickers or die cuts from the same set, you won't have to worry about finding some th

Decorating Your Egg Carton Gift Box

Image
For the past two day's we've been looking at spring ideas using an egg carton as a gift box. To see my gift-filled eggs, read here , and to read how to fill it with mini cupcakes, click here . Today we're going to decorate the lid of the egg carton. To make this egg carton gift box lid decoration, I used textured card stock, two decorator papers, a die cut tag, self-adhesive ribbon, paper flowers and a metal brad. It doesn't matter what type of life your egg carton has, you can still attach decoration to it. If it is flat, you can work with it like any other paper craft surface. If it has dips and divots like mine does, 3D adhesive works great. The easiest way to make a paper mat for anything - whether it's the front of a card or the top of an egg carton - is to flip the paper over, lay it on your background and mark the desired height and width you want. Tiny tick marks will do just fine. Then you can use your paper cutter with those ar

Egg Carton Mini Cupcakes

Image
Today I’m going to share part 2 of my mini-series about how to use egg cartons in fun ways this spring. Yesterday we talked about gift giving - if you haven’t read that post yet, do that here . And now we go from tiny gifts to gifts of food. Fill your egg carton with mini cupcakes decorated with spring colors! You can make half an egg carton (6 eggs) for a widow, widower or someone else who lives alone. A 12-count carton is perfect for a couple or a small family, and a carton of 18 cupcakes, like the one pictured here, would be great for a large family. Mini cupcakes take about 2/3 the time to bake as regular cupcakes, so time them accordingly. They also need paper wrappers, as they tend to stick to the baking tin sides. Once they’re called completely, layer on the frosting and your favorite decorations. Here I used nonpareils, pink sanding sugar and spring sprinkles. The more frosting the better, obviously, but remember that you’re going to be closing the lid, and you don’t w

Egg Carton Gift Boxes For Easter And Spring

Image
If you would have opened that one cabinet door in our kitchen a week ago, you probably would have questioned my sanity. I had been saving egg cartons for weeks specifically for this spring ... there were a lot of them. So for the next three days I’m going to show you why I was saving them. (And not just to rescue my sanity.) There are so many ways you can use an egg carton in your paper crafting and gift giving, so let’s start today with a gift box. Whether you have children, grandchildren or students, egg cartons can be a fun way to share gifts and surprises. You don’t have to use plastic eggs to hold the tiny gifts, though. Items of the right size will fit right into each space. But how much fun would it be to open an egg carton gift box and find little eggs just waiting to be cracked open? A trip to the dollar store will provide you with the eggs, if you don’t already have them, and fun little gifts to tuck inside. Some can be candy, some can be trinkets, and all can be ta

Words For Wednesday

Image

National PB&J Day Cookie Sandwiches

Image
Isn’t it wonderful that there’s an entire day set aside to enjoy all things peanut butter and jelly? When I was growing up I took a pb&j sandwich to school every single day. It was pretty much the foundation of my childhood. But why make a peanut butter and jelly sandwich out of bread when you can make it out of peanut butter cookies? Since I’m a grown up now, I think this sounds like an amazing idea! To make the cookies, combine 1 cup of peanut butter, one cup of sugar and 1 egg. Mix it all together until smooth. Drop 1-inch balls on a cookie sheet and make the criss-cross pattern with a fork. Bake them at 350 degrees for 8-10 minutes, until they’re just browned and pretty. Once the cookies have cooled completely, spread a thin layer of frosting on half of them. Spoon on and spread your favorite flavor of jelly on top. Add the second cookie to make the sandwich. The yummy, tasty, addictive sandwich. Enjoy!