Posts

Showing posts from June, 2019

Sunday Sketch

Image
With just a few more days until the 4th of July, today’s sketch explodes with sparkles and creativity. (See what I did there? Explodes...yeah, you got it.) The background of the sketch ties directly to the theme - fireworks and Independence Day. It’s hand-stamped and decorated, and I’ll show you tomorrow how I did it. The phrase is stamped and run as a banner across the bottom of the card. It’s accented with more fireworks because, let’s be honest, you can never have too many fireworks. Unless it’s midnight and the neighbors keep firing them off. Ready to make this sketch your own? Start with a white card stock card base. Then cut your decorator paper 1/4 inch smaller so you have a border around all four edges. You can also use a color instead of white if it coordinates better with your decorator paper. Once you’ve stamped or printed or cut out your sentiment, mat it on a coordinating piece of card stock, leaving a border on the top and bottom. Then attach it close to the b

DIY Patriotic 4th Of July Wreath

Image
Let’s start this week before Independence Day at the front door! You can put together a fun patriotic wreath with just four simple pieces - and you can mix and match and red, white and blue decorations in it that you want. So get creative! For my wreath, I used my white wreath, which is a wreath form with several lengths of white, glittered garland wrapped around and through it. The rest is from the dollar store - wood stars on burlap, star scatter and stars-and-stripes burlap ribbon. The strip of burlap was the perfect length to go around the wreath six times. Hanging it while I work is always easier for me, but work it however you’d like. The stars on burlap is attached through the wreath and not he back with a twist tie. Then comes the fun part! The red and blue stars from the scatter are just tucked securely into the wreath. You could always glue them in if you’d like to keep it for the next year, but I use this wreath for everything, so I like to keep

Why We Will Always Love Special Orders

Image
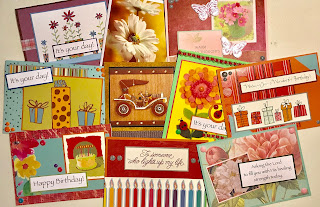
This week I’ve been working on a special order of 30 handmade cards - 10 each of birthday, sympathy and encouragement. The friend who ordered them is a regular customer, and I love that we love the same things when it comes to cards: something pretty, something meaningful and something that shares our faith. Inside all of my cards (and sometimes on the outside), you’ll find Scripture. That has been the core of everything Stuff From Trees stands for since the beginning. We are Christians before every other name or description we have. We’ve done many projects for many different people, but we will always run this shop the way we feel God is leading us to. We sold out of much of our inventory over the Christmas season, and we are slowly beginning to put more items back into the Etsy shop. We pray over every piece we make, and we pray for the people who will purchase them and receive them as gifts. We’re not just putting a sticker on a piece of paper or painting a piece of wood. We’

Someone Totally Needs To Invent A Smell-O-Phone

Image
Danny had yesterday off, and he was able to get so much done on the property. (Thank you, Lord, for keeping the rain away.) So there I was, sitting at work minding my own business, when I get this text. Attached was the picture above with the words: About to go on. My wonderful, amazing, talented husband was grilling St. Louis Ribs! Maybe he should have a day off more often ... not so subtle hint there. All he did was a put a simple dry rub on them to start with. The secret then is to cook them fairly slowly without letting the temperature get too high too fast. He made a three-ingredient basting sauce, and that was it. But it takes mad skills, I tell you. So when I got home, they were done and resting. This is the finished product, and they were SO good. I thank Butcher Box for the grass-fed meat and Danny for spoiling me like crazy every chance he gets.

Words For Wednesday

Image

Sunday Sketches

Image
One of the many reasons I love today’s sketch is because you can combine several colors and patterns on one card with it, and you won't end up with a mish-mash of papers. Draw from the colors of your main image, and you'll have a fun card put together. For my card, I started with the birthday packages and chose my color pallet from it. That's how I coordinated the patterned paper behind it and the teal corners. I also had a sentiment the same length as the image, and I matted them and staggered them across the card from each other. Because of the metallic sentiment and background paper, I used silver, glittered acrylic dots as embellishments in the two empty corners. Ready to make this sketch your own? Start by choosing a great image, then use those colors for your card's color scheme. You'll need a solid background and two patterned papers for the panel and the corners. Look for a sentiment - or create one in your word processing program - the same shape

Lessons Learned While Training Dogs

Image
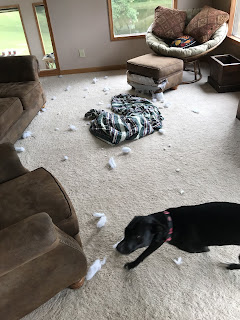
See that blur at the bottom of this photo? That is our Callie dog hurrying out of the room because she knows she’s in trouble. The puppies are two years old now, and we’re finally able to leave them out of their crate for short periods of time. They are too smart for their own good, and having copious amounts of time to do stuff can be a dangerous thing ... for their blanket and the footstool. So what am I learning in this transition phase from babies to grown-up dogs? * pick everything up off the floor, unless you want it shredded and eaten. * give them something to occupy their minds, like toys, unless you want your nice things shredded and eaten. * start with incredibly short periods of time and work your way up, unless you want everything in the room shredded and eaten. * make sure they’ve been outside and they’re empty before you leave, unless you want everything peed on before it’s shredded and eaten. We’re definitely still a work in progress. I’d like to say we’r

The Best Laid Plans...

Image
Today is the longest day of the year and the first day of summer. I was so prepared for the event - I had social media ready at work, I was going to get some great pictures of the sunshine and I was going to spend some time out in the hammock relaxing in the warm summer sun. But that was not meant to be. Instead of extended hours of sunlight, dark clouds blotted out the sun. It was fairly warm, but not enough to sit outside, let alone bask in the warmth. To be totally honest, I wondered why God has chosen to fill the past few months with clouds and dreariness and rain. We’re not able to get outside and do the things we consider important for being good stewards of what He’s given us. My planner is filled with to-do lists that keep getting pushed back week after week. For my thoughts are not your thoughts, neither are your ways my ways, saith the LORD. For as the heavens are higher than the earth, so are my ways higher than your ways, and my thoughts than your thoughts. For as

Our Corn Hole Board Project

Image
Cornhole, Bean Bag Toss, or Bags? Whatever you call it, this is one popular game!  Whether at the State Fair or in your own backyard, many hours have been spent targeting that 9-inch hole on a 2x4-foot board with a small bag of “beans.” This set was ordered from Stuff from Trees by a friend as an anniversary present for her husband last year. Customized with his favorite sports team logos, wood burned and colored by hand, Danny said it was truly a pleasure to build these boards for him!  Made from 3/4” plywood and premium 2x4’s, they feature dark-stained edges and a polyurethaned surface.  The legs fold up inside the base for easy storage.  Here are just a few behind-the-scenes pictures of the corn hole board-creating process: Interested in getting a set of corn hole boards for your next event or gathering? We'd love to make them for you! You can message us, call us, email us, yell out the window at us - just contact us! You c

Words For Wednesday

Image

Deconstructed Spicy Tuna Rolls

Image
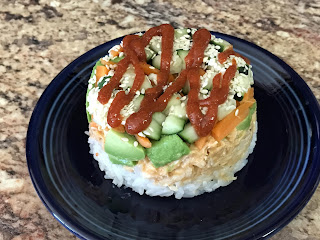
In celebration of National Sushi Day today, our house is now filled with the smell of spicy tuna! I will note that I love sushi in all its forms, and every day should be Sushi Day. But I digress... To make these gorgeous desconstructed sushi rolls, you’ll need to pick out your favorite combination of ingredients. Again, I know this will be difficult because they’re all amazing. I get that. Just choose one to start. I started with an easy one - spicy tuna. I combined one can of white albacore chunk tuna (drained) with a mix of mayonnaise and sriracha sauce. You don’t need much, just enough to coat the tuna. Set that aside and get to work on the veggies. Dice cucumber, carrots and avocado and set them aside. Now for the rice. You can go all out and make your own, but I found the prepackaged sticky rice that you heat in the oven for 60 seconds. Yay! That works for me. Prep work is not my favorite part of cooking. Now for the fun part...constructing a deconstructed sushi roll.

Creating A Quiet Time Space Just For Me

Image
While I love routine and I love sticking to a plan, there’s nothing that bores me more than being in a rut. You know that a rut is just a grave with the ends kicked out, right? For many months now I have set up a quiet time space at the dining room table. We have an enormous table that’s super high so I can slide on and off the chairs more easily. It really helps my fibromyalgia to not get up and down all the time. That being said, I don’t like the clutter of having the table covered in books and papers. And I also don’t like putting all my study supplies in bags and boxes every morning when I’m done with them. Yes, I know that’s super picky, but it definitely helps my state of mind to have clear, clean spaces around me. So the answer was to completely rearrange the living room. Ok, there may have been other answers, but this one was too much fun. We’ve started leaving the puppies out with Molly part of the day instead of keeping them in their crate, so the carpet needed clea

Sunday Sketches

Image
Wishing everyone, especially my dad, a Happy Father's Day today! And the sketch for today makes an amazing card perfect for the men in your life. For this birthday card, I layered the die cut in the middle on two patterns of paper in the same color. All three were then matted on black card stock to anchor them all as one design element. The background is the same black card stock and a metallic gold patterned paper. The overall design is very masculine, and the sketch could be used for any occasion. Ready to make your own card with this sketch? Start with a solid card stock and a small, simple patterned decorator paper. There won't be much of it showing around the center panel, so make good use of that border space. Create that center panel with an image in one block and the sentiment in the other. Overlapping is always fun, or you can keep them in their own spaces, depending on the look you're going for. Then add strips of two patterned papers behind the image an

Doggie Ice Cream On A Hot Summer Day

Image
Look at those sweet faces! You'd think I made those ice cream treats for them. Which, actually, I did. A friend sent me a three-ingredient doggie ice cream recipe last week, and I just had to spoil the puppies with it. Those looks of anticipation are totally worth it. I don't have a large blender, so I used the 2-cup blender cup I make my protein shakes in. In it I combined about 1/3 cup of peanut butter, 1 cup of plain yogurt and an overly ripe banana. They get blended really well, until it's all smooth and creamy. The recipe itself is fairly easy, but the possibilities are endless. I pulled out my silicon baking sheets in several different shapes to make my treats. They just go in the freezer for a couple of hours, and they're ready to go. I've had to use them as treats, given in small portions, because they absolutely adore them. They're perfect for this time of year, as a little refreshment on a hot summer day. Try them yourself and see how much yo

A Little Golden Book Bedtime Journal

Image
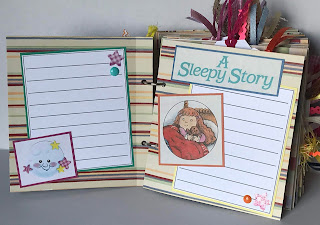
For those of us who journal, it comes as naturally as breathing most days. When one book is almost full, we're already on the look out for the next one. If you're a bedtime journaler, you know how important it is to get your thoughts out at the end of the day. Otherwise they're all circling in your head through the night. That's where this adorable bedtime journal comes in. If you're ready for your little girl to start journaling at bedtime - or you want a super-cute little journal for yourself - you can't pass this up. It's made from an upcycled Little Golden Book called A Sleepy Story, and it's been altered to become a beautiful new book. I always use the original book pages in my journals, and this one is no exception. You'll love this sweet little girl's tale of hearing a bedtime story. The middle of the story takes an unexpected twist, which is even better! Every other set of pages contains journaling blocks that have

Baked Mexican Tortilla Stackers

Image
In the heat of summer, I can’t say the idea of cooking thrills me. I usually rely on something quick, something that doesn’t require cooking at all or a slow cooker meal. This Mexican tortilla stacker falls into the first category - a recipe that only requires a few minutes of the stove and a few more in the oven. This means not too much heat when you’re already too warm. Another great way to make this recipe your own is to change up the ingredients. Love tomatoes and aren’t too fond of chilis? Switch them out. Want different cheese? Do it! Have fun trying a variety of different flavor combinations. 2 lbs ground beef 1 medium onion, diced 3 Tbsp minced garlic 1 4.5-oz can chopped green chilis 1 24-oz can red enchilada sauce 6 6-inch tortillas 1 8-oz bag Mexican blend shredded cheese 1. Preheat oven to 375 degrees. 2. Brown ground beef in a cast iron skillet. 3. Add onion, garlic and chilis, cooking until tender and warmed through. 4. Pour about 1/2 cup red enchila

Words For Wednesday

Image

DIY Jewelry From The Clearance Sale

Image
While shopping last week, I happened to come across a Clearance Sale basket with a boatload of craft supplies in it. With beads, chains and other fun stuff for only $1 each, I hit the jackpot. The result was these adorable summer bracelets. Here's what I ended up with for $7. I absolutely adore these beads, so I snapped up all four sets that were in there. I also found two kinds of bracelets and a necklace to thread the beads on. As can be expected for $1, though, the necklace is going to need a little fixing before it's usable. But that's ok. One end of this bracelet unscrews so you can thread it. It's a little small for me, but I love this look. And I love these slinky bracelets, though I'll have to add crimpers at both ends to keep the beads in place. The end results of my Clearance Sale adventure were these three beautiful bracelets, and I can keep them for myself or give them as a gift! Have you done some DIY yourself? What&

Three Ways To Keep Your Tongue From Sin

Image
It’s unusual for me to only read one verse of Scripture during my morning quiet time, but that’s what happened this week. This verse stopped me in my tracks. In my job, everything I do requires words. I write, read, speak and listen. Without words, life is just pictures, and while pictures are great, I need words! During my Psalms study this weekend, I started reading in Psalm 39. And I stayed in that first verse for ages. I said, I will take heed to my ways, that I sin not with my tongue: I will keep my mouth with a bridle, while the wicked is before me. Psalm 39:1 I wonder what prompted David to write these words. Had he said something in anger or been hurt by someone else’s words? Was there something said that he wished he could take back? Did he resolve to not speak in the evil ways of the people around him? Whatever the situation was, David committed himself to being acutely aware of what words he chose to speak. He would take heed, he would pay attention, to the way

Sunday Sketches

Image
My guess is that you have a boatload of summer birthday parties coming up. If you do, you’ll love being able to use this sketch and make some incredibly memorable birthday cards! I used my denim paper stack to make a whole set of cards, and this one was my favorite. It would work perfectly for an older boy because of the more masculine colors. The sketch itself is pretty amazing, too. The strip of leather-looking decorator paper for the center banner breaks up the pattern, and the two dark denims are perfect for contrasting mats. The images are all textured, so that adds a little more dimension. Ready to make this sketch your own? Start with a small pattern for your background paper. Then you’ll need a contrasting pattern for your center banner and two more colors for mats. The large image is your focal point, so mat it on a square of paper that will really make it pop. Then add your sentiment to overlap it, and finish with another accent or two. The grommets on the left si

Be A Tourist In Your Own Hometown

Image
One of the best parts of my job at the Convention & Visitors Bureau is being active in community events. There is so much going on in Ottumwa, and it’s so much fun to keep up the calendar on our website, filling it with places to go and things to do. Have you ever stopped to look around you when you’re in your own hometown? Or are you just on autopilot, running the errands and doing the things that you absolutely have to get done? When people come in to our office, they’re often looking for the events, food and attractions that they can’t see or do anywhere else. Isn’t that what we do when we’re traveling? We don’t eat at restaurants we have at home - we want to try the signature dishes that we can’t get every day. We want to shop for souvenirs and take pictures of things we might only see this once. I encourage you to be a tourist in your own hometown this summer. Pick up a visitors guide or go on your local tourism website. (Ours is GreaterOttumwaCVB.org ) You’ll be remin